Description
What is surface profile gauge ?
Surface profile gauge is a type of profile gauge that measures the surface roughness of an object, usually to facilitate substrate preparation and the application of a protective coating. This tool records the roughness or cross-sectional shape that may be already observe on a surface. Surface Profile Gauge for Blasted Steel, Textured Coatings and Concrete Profile.
The surface profile gauge consists of a set of steel or plastic pins that are set tightly against one another in a frame that keeps them on the same plane while allowing them to move independently and perpendicular to the frame. When the pins are pressing against an object, they conform to the topography of the object’s surface. By looking at the gauge, the technician can determine the height or depth of surface irregularities. The gauge can also be uses to draw the profile on another surface.
The proper use of a surface profile gauge can improve a coating’s overall performance and is a determining factor for how adhesion, coverage and also overall volume of coatings is use. If there is an instance where the surface profile is too large, then the amount of coating needed increases. There is also the possibility that the peaks will remain uncoated, thus reducing the effectiveness of the coating and increasing the chances of future corrosion. Alternatively, when the surface profile is too small it results in insufficient coating adhesion, which leads to premature coating failure.
The profile height of a surface should be accurately measure to ensure that the correct surface preparation has been performed and to optimize coating usage performance. This parameter is essential as it determines the adhesion, coverage and overall volume of coating used.
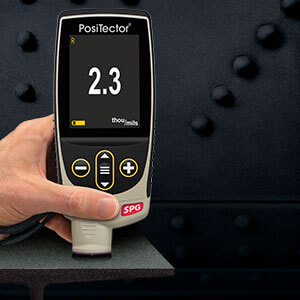
PosiTector 6000 as a SPG Surface Profile Gauge. Video
ASTM D4417-B, AS 3894.5-C (with optional 30° tip angle), U.S. Navy NSI 009-32, SANS 5772 and others.
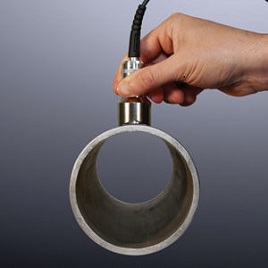
All PosiTector 6000 probes can be used with the PosiTector SmartLink. A small piece of hardware that physically connects to new and existing PosiTector probes either. It is also available by wireless connects to a free PosiTector app, and turning it into a virtual PosiTector gauge. You will find the Smart Link device under ‘accessories’.
PosiTector Surface Profile gauge is Digital depth micrometer measures and also records peak to valley surface profile heights
- NEW Larger 2.8″ impact resistant color touchscreen with redesigned keypad for quick menu navigation
- NEW Weatherproof, dustproof, and water-resistant—IP65-rated enclosure
- Alumina wear face and tungsten carbide tip for long life and continuous accuracy—field replaceable
- PosiTector interchangeable platform—attach any PosiTector probe to a single gage body
- Fast measurement rate of over 50 readings per minute—for quickly measuring large surfaces
- USB, WiFi, and Bluetooth connectivity to PosiSoft PC, Mac, and also Smartphone software
- Certificate of Calibration showing traceability to PTB is also included (Long Form)


Surface Profile Gauge — A Comparison of Measurement Methods
Coating performance is related to the profile height on a steel surface. Three types of devices are available to take measurements of this surface profile. Such as replica tape, depth micrometers fitted with pointed probes, and also stylus roughness testers. This paper presents results from a recent analysis of measurements taken by the three device types on steel blasted. With an assortment of blast media and proposes a new method of depth micrometer measurement called average of the maximum peaks.
Introduction to Surface Profile Gauge Measurement
Steel surfaces are frequently clean by abrasive impact prior to the application of protective coatings. This process removes previous coatings and roughens the surface to improve coating adhesion. The resultant surface profile, or anchor pattern, is comprises of a complex pattern of peaks and valleys. Which must be accurately assesses to ensure compliance with job or contract specifications.
Protective coating professionals have several testing methods available to them for determining the amount of surface profile. Little information has been available to help them select an instrument or compare results from different methods.
How Depth Micrometers Measure Surface Profile and How They Compare to Replica Tape Readers and Stylus Roughness Instruments.
A depth micrometer instrument has a flat base which rests on the surface and a spring-loaded probe which drops into the valleys of the surface profile. The flat base rests on the highest peaks and each measurement is therefore the distance between the highest local peaks and the particular valley into which the tip has projected.
Currently, ASTM D4417 requires the user to average all depth micrometer measurements regardless of how low some readings might be. Not surprisingly, final calculated results are usually less than what is obtained by tape and stylus methods. This study confirmed that assumption (Fig.12). Occasionally one of the instruments would register values at or above tape results, but that was the exception.
After the ASTM 5-panel study referenced above, the depth micrometer method was the only method without a comparison study. To provide correlation between all three device types, this paper proposes that depth micrometer measurements are analysis using a method that produces results similar to tape and stylus results. And is consistent with their measurement objectives, a method called “average of the maximum peaks”.
To obtain this value, the profile is measure at a sufficient number of locations to characterize the surface, typically five. At each location, ten readings are taken and the highest reading is recording. The average (mean) for all the locations is report as the profile of the surface.
Impetus for this study came from preliminary testing on ASTM panels with a single depth micrometer instrument. When the average of the maximum peaks method of analysis was using, depth micrometers results aligned closely with tape and stylus results.

Conclusion and reduction.
Results from this study confirm a close relationship between tape and stylus measurements as first shown by ASTM round robin testing. The results also revealed interesting information about the third measurement device type. The surface profile depth micrometers, which achieved results comparable to tape and stylus. When “average of the maximum peaks” analysis approach was uses.
The surface of blasted steel at any point is a random variation, so a number of readings must be taken. The assessment objective is to make maximum peak to valley determinations. Individual measurements of the surface of an abrasive blast-cleaned metal surface vary significantly from area to area over a given surface. How these measurements are combining depends on the parameter required for the job which could be the average peak-to-valley height, its maximum, or even something else. By employing the “average of the maximum peaks” analysis approach, a depth micrometer gives reliable surface profile measurements that correlate closely to replica tape and stylus roughness tester results.
PosiTector SPG Advanced models feature a SmartBatch mode to comply with various standards and test methods. By default, SmartBatch generates results close to those obtained with replica tape and drag stylus methods by automatically averaging the maximum profile depth for all spots within the test area and displaying “the average of the maximum peaks”.
For more detail and related products information, please contact us.


